

You catch your reflection in a shop window and notice your shoulders sitting forward, your upper back rounded and your head reaching towards the glass. At your desk, you may feel neck tightness by the afternoon, or find that raising your arms overhead feels less natural than it used to. The obvious question is how to fix rounded shoulders without spending your life stretching against a doorway.
The honest answer is less dramatic than most quick-fix promises. Rounded shoulders usually develop through repeated positions and habits, so lasting improvement comes from combining mobility, progressive strengthening, workstation changes and consistent movement, rather than forcing your body into a perfect pose for a few minutes.
Table of Contents
- Why Rounded Shoulders Happen and What They Mean for Your Body
- A Progressive Home Program of Stretches and Strengthening Exercises
- Ergonomic and Lifestyle Adjustments That Support Lasting Change
- When to See a Practitioner and How Osteopathic Care Can Help
- Troubleshooting Common Problems and Adapting for Pain or Limited Mobility
- Your 4 to 8 Week Plan for Tracking Progress and Staying on Course
Why Rounded Shoulders Happen and What They Mean for Your Body
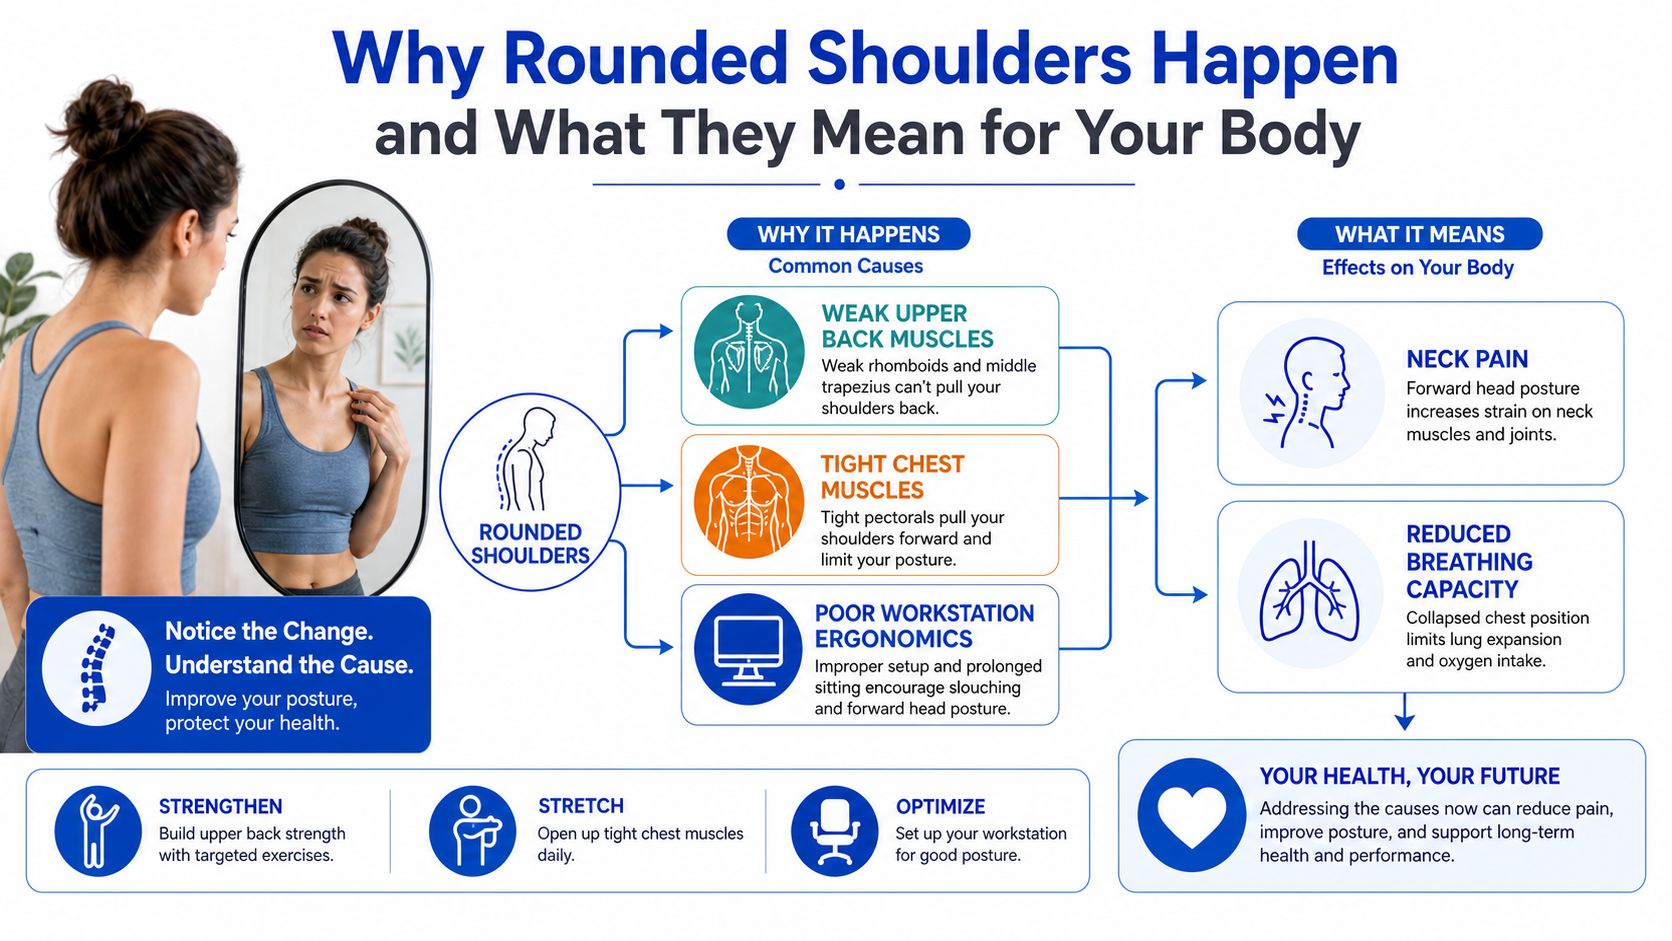
Rounded shoulders describe a visible change in how the head, shoulder blades and upper torso stack. The shoulders drift forwards, the upper back becomes more flexed and the head often moves ahead of the ribcage. Clinicians may also describe a related pattern as upper crossed syndrome, particularly when forward head posture and upper-chest tightness appear alongside reduced control through the upper back.
A desk worker provides a familiar example. You lean towards a laptop to read a small screen, keep your arms in front of you to type and remain in that position while answering messages on your phone. Over time, the pectoralis major and minor can become short and irritable, while the rhomboids, lower trapezius and deep cervical flexors may contribute less effectively to the position and movement of the shoulder girdle.
The alignment problem is broader than the shoulders
Australian posture guidance gives a useful starting benchmark. Healthdirect's posture advice describes good posture as keeping the back straight, with the ears, shoulders and hips aligned as much as possible, while allowing the shoulders to remain relaxed. The University of Melbourne's ergonomics guidance similarly places the ears in line with the shoulders and the top of the shoulder over the hips.
Rounded shoulders represent a breakdown in that stacked position. The thoracic spine may lose comfortable extension, the shoulder blades may move less efficiently across the ribcage, and the neck and shoulder muscles may work harder to keep your eyes level. That altered movement can contribute to irritation around the neck, shoulder or rotator cuff, although the posture itself doesn't prove that a specific tissue is damaged.
Practical rule: Treat the position as an adaptable movement pattern, not a permanent defect.
Rounded shoulders aren't a disease. They're an adaptation to repeated sitting, device use, driving, desk work or other tasks that keep the arms and head in front of the body. The pattern can improve, but a body that has practised it for years won't usually change after one forceful stretch. Think in terms of weeks to months of deliberate practice, with gradual improvements in comfort, control and endurance.
The Australian burden of musculoskeletal problems also makes this a practical self-management issue rather than a cosmetic concern. Healthdirect and other Australian guidance emphasise daily habits, supported sitting, a neutral spine and regular movement, while a commonly cited national estimate places yearly back problems at about 4 million people, or 1 in 6 Australians. That figure concerns back problems broadly, not rounded shoulders specifically, but it shows why small, repeatable changes matter.
A Progressive Home Program of Stretches and Strengthening Exercises
Rounded shoulders develop through repeated positions and habits, so lasting improvement comes from combining mobility, progressive strengthening, workstation changes and consistent movement rather than forcing your body into a perfect pose for a few minutes. A practical sequence is to lengthen restricted front-of-shoulder tissues, restore upper-back movement, then strengthen the muscles that control the shoulder blades. An Australian evidence summary on forward head posture and protracted shoulders supports this stepwise approach, with attention to the rhomboids, lower trapezius and rotator cuff. The evidence summary also cautions that stretching or mobility work alone is unlikely to be enough.
Begin with comfortable movement. Pulling the shoulders forcefully backwards can create neck tension, rib flare or a pinching sensation instead of better control.
Phase one, create room to move
Doorway pectoral stretch: Place your forearms on a door frame and step forwards until you feel a mild stretch across the chest and front of the shoulders. Keep your ribs gently down. Hold for 3 sets of 30 seconds. Avoid arching your lower back or turning the stretch into a shoulder pinch.
Thoracic extension over a foam roller: Lie on your back with the roller across the upper back. Support your head with your hands and extend gently over the roller, keeping the movement in the upper back rather than forcing the neck. Complete 10 controlled repetitions.
Wall angels: Stand with your back against a wall, feet slightly forward and ribs relaxed. Slide your arms upwards only as far as you can without shrugging or arching your lower back, then return slowly for 2 sets of 10.
Breathe out as you move towards the easier end of each range. A mild stretch or muscle effort is acceptable. Sharp pain, tingling or catching means you should stop and reassess the movement.
Phase two, teach the shoulder blades to work
Once the chest feels less restrictive, add resistance-based control.
Prone Y-T-W raises: Lie face down or hinge forwards with a neutral spine. Lift the arms into a Y, T and W shape, keeping the shoulders away from the ears and the thumbs in a comfortable direction. Perform 3 sets of 8 in each position, using a smaller range if needed.
Band pull-aparts: Hold a light resistance band at chest height. Draw it apart without flaring the ribs, then return under control. Complete 3 sets of 15. Let the shoulder blades and upper back do the work, rather than shrugging.
Scapular retractions: Sit or stand tall, gently draw the shoulder blades back and slightly down, hold for 5 seconds, then release fully. Do 3 sets of 10. Use enough effort to improve control without thrusting the chest forwards.
For the first two weeks, practise the routine 4 to 5 days per week. Once it feels familiar, reduce it to 3 to 4 days per week while keeping up regular movement during the day. Consistency matters more than following a perfect schedule, because control develops through repeated practice.
A 10-week corrective programme involving Australian dental health students improved work-posture risk scores by 1.88 RULA points The study abstract, increased neck flexor strength by 17.2% and neck extensor strength by 23.2%, and reported 77% clinical performance. Shoulder strength and neck or shoulder symptom severity did not improve, however. That result is useful clinically: posture drills can improve control without resolving every pain complaint. Progress the programme towards posterior-chain strengthening and symptom-specific loading rather than stopping at awareness exercises.
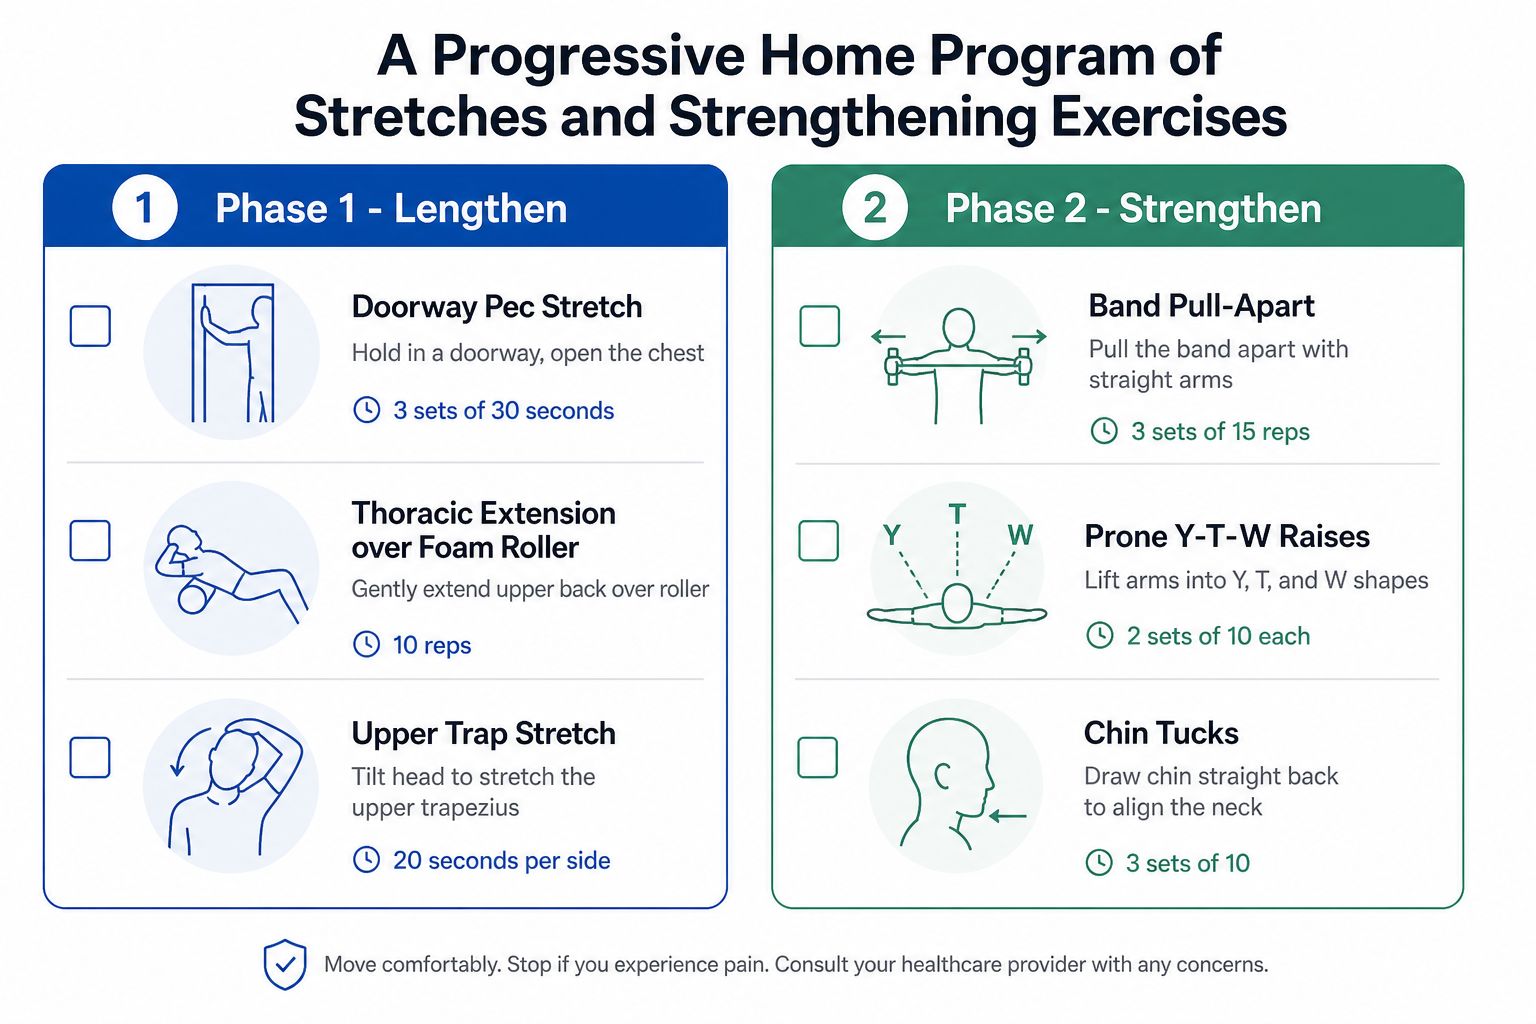
Use the accompanying movement demonstration as a reference for pacing and positioning:
Ergonomic and Lifestyle Adjustments That Support Lasting Change
Working from a setup that keeps your arms and head forward can undermine a well-designed exercise routine. Set up your environment so a neutral position feels comfortable, then interrupt static sitting before fatigue draws you forwards. Long-term change depends on reducing repeated strain, not repeatedly forcing your shoulders into place.
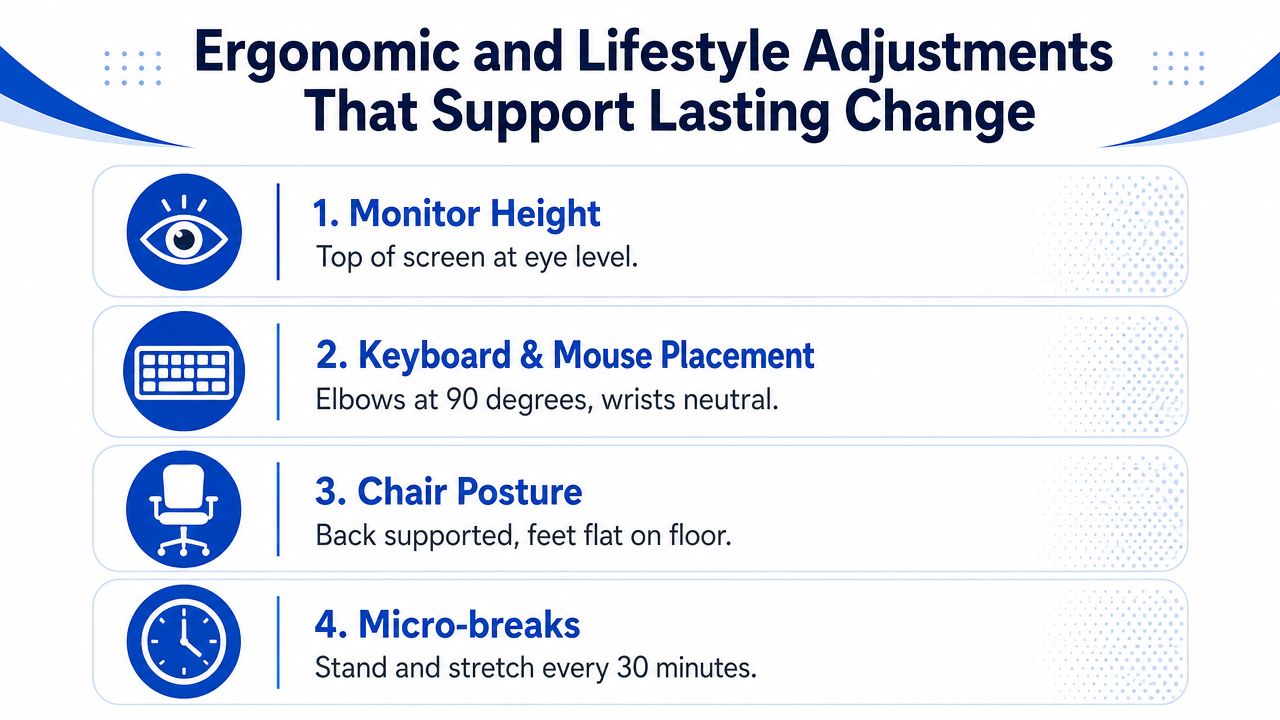
Set the top of your monitor at eye level, and keep the keyboard and mouse close enough for your elbows to remain near your body. Support your forearms where possible. Keep both feet flat on the floor, and adjust the chair so it supports your back without lifting your shoulders towards your ears.
Use this posture and corporate ergonomics visual to review the relationship between your desk, chair, screen and working position.

Make movement automatic
Every 20 minutes, take 20 seconds to stand, let your arms hang, perform a few gentle scapular retractions and extend through the thoracic spine. A brief change of position is often more useful than trying to maintain perfect alignment throughout a long, uninterrupted sitting period.
Use these practical checks during the workday:
- Screen position: Keep the monitor at eye level so your head does not gradually drift forwards.
- Arm position: Keep your elbows close to your body and avoid reaching repeatedly for the mouse.
- Foot support: Place both feet flat rather than perching on the chair's edge.
- Shoulder position: Allow the shoulders to relax instead of pinning them down forcefully.
- Movement breaks: Stand, walk or change position before discomfort becomes the prompt.
Phone use can recreate the same pattern. A phone stand, voice-to-text and headphones may reduce the time your arms and head spend reaching forwards. Avoid cradling the phone between your ear and shoulder, because that combines neck side-bending with an uneven shoulder position.
Sleep position may affect morning comfort. Side sleepers can choose a pillow that supports the head without allowing the upper shoulder to collapse forwards. If stomach sleeping leaves your neck twisted or your upper back strained, trial another position before assuming the daytime exercise plan has failed.
Attach posture checks to routines you already perform. While the kettle boils, soften your ribs, lengthen through the crown of your head and let the shoulder blades settle. At a red light, relax your grip on the steering wheel and check that one shoulder has not lifted towards your ear. These prompts make correction easier to repeat without turning it into another demanding task.
When to See a Practitioner and How Osteopathic Care Can Help
Home exercises work when symptoms are mild, movement is comfortable and the routine does not increase pain. Arrange an assessment if your presentation suggests a neck, nerve, joint or shoulder problem that needs a more specific plan.
Seek professional guidance for persistent pain, numbness or tingling into the arm or fingers, a clear loss of overhead movement, or postural changes that continue to worsen despite consistent effort. A recent injury, known osteoporosis or marked restriction when turning your head or raising your arms also warrants assessment before you increase loading.
Exercise research supports a measured approach. A 2024 meta-analysis found that exercise can improve rounded-shoulder angles, although results depend on the programme and do not guarantee a complete correction. Other evidence found that adding scapular mechanical correction to postural exercise did not produce a meaningful difference in posture or muscle stiffness for sedentary workers. A systematic review of therapeutic exercise and posture describes a nuanced evidence base, with clearer benefits for forward head posture in some neuromuscular approaches than for rounded shoulders alone.
What an osteopathic consultation may examine
At Bayside Osteopathic Health, an osteopathic assessment may examine how the neck, upper back, ribs, shoulders and breathing pattern work together. The practitioner can observe your resting posture and functional movements, assess joint mobility, and examine soft tissues around the chest, upper trapezius and shoulder girdle.
Treatment may include gentle thoracic mobilisation, soft-tissue or myofascial techniques, rib articulation and movement advice. These options may make restricted movement more comfortable and clarify which loads provoke symptoms, so you can practise the home programme with better control. Manual treatment complements progressive strengthening and workstation changes, but does not replace either.
This osteopathic treatment guide provides a visual reference for deciding when hands-on care may be appropriate.

Track useful function rather than judging progress only by shoulder angle. Record how long you can work before symptoms appear, whether overhead reach feels easier and whether you complete exercises without compensating. Review the combined plan over 4 to 8 weeks, adjusting it according to symptoms, strength and function rather than expecting instant correction.
Troubleshooting Common Problems and Adapting for Pain or Limited Mobility
A posture programme can be well designed and still fail if every exercise is treated as compulsory. Discomfort is information, not a test of commitment. If a movement repeatedly causes sharp pain, tingling, catching or increasing symptoms afterwards, reduce the range, change the exercise or seek assessment.
Neck strain during wall angels usually means the head is being forced against the wall or the ribs are flaring to create extra range. Move your feet further forwards, allow the head to rest naturally and slide the arms only through the range you can control. If the lower back arches, imagine bringing the front ribs gently towards the pelvis rather than pressing harder into the wall.
Shrugging during band pull-aparts or scapular retractions is another common compensation. Use a lighter band, keep the collarbones broad and think of the shoulder blades gliding slightly down and back, not clamping together. You should feel work around the mid-back, not tension climbing into the neck.
Adapt the exercise to the person
For an older adult with osteoporosis or marked thoracic stiffness, begin seated with the back supported. Try gentle thoracic extension over the chair back, small-range band pull-aparts and supported chin nods instead of lying prone or forcing a deep spinal movement. Avoid aggressive end-range flexion, twisting or pressure-based techniques unless a qualified clinician has cleared them.
A person with rotator cuff irritation may tolerate scapular setting and low-range rows better than Y raises. Someone with a frozen shoulder should work within a comfortable range and prioritise gentle mobility, while a person with cervical disc symptoms may need to omit chin tucks or overhead work if those movements reproduce arm symptoms.
Stop and reassess: Mild muscular fatigue can be expected. Sharp pain, spreading symptoms or a clear loss of function is not a productive challenge.
Stretching that feels ineffective may be addressing the wrong restriction. The upper back, ribs, neck and breathing pattern can all influence shoulder movement, so repeatedly pulling harder on the chest won't solve every presentation. The practical test is whether your movement becomes easier and your daily symptoms settle, not whether the stretch feels intense.
Your 4 to 8 Week Plan for Tracking Progress and Staying on Course
A useful plan gives you a small task for each stage and a way to notice change that isn't dependent on staring at your shoulders in a mirror. Begin with the routine you can repeat, then increase the challenge only when the current version feels controlled.
| Week | Focus Area | Frequency | Key Milestone |
|---|---|---|---|
| 1 | Awareness, chest mobility and gentle thoracic movement | 4 to 5 days | You can recognise when your head and shoulders drift forwards |
| 2 | Consistent mobility with relaxed shoulder positioning | 4 to 5 days | You complete the routine without shrugging or lower-back arching |
| 3 | Introduce posterior shoulder and upper-back strengthening | 3 to 4 days | You feel mid-back effort rather than neck dominance |
| 4 | Build control with holds and appropriate resistance | 3 to 4 days | Desk and phone habits create fewer symptom-provoking positions |
| 5 to 6 | Integrate movement into work, driving and household tasks | 3 to 4 days, plus movement breaks | You maintain better control during ordinary activities |
| 7 to 8 | Vary exercises and establish maintenance | 3 days, plus regular movement | You can choose a sustainable routine without constant reminders |
Use a wall-stand check at the start and repeat it at the same time of day later. Stand comfortably with your back near a wall, without forcing the head or shoulders into contact, and notice how much effort you need to stack the body. You can also take relaxed side-view photos in consistent clothing and lighting. The purpose isn't to chase a perfect silhouette. Look for easier alignment, smoother arm movement and less effort.
A plateau around the fourth week doesn't automatically mean the programme has failed. You may need to vary the resistance, extend a controlled hold, revisit your monitor position or address a symptom that is limiting progress. Exercise evidence supports improvement for some people, but effects can be modest and inconsistent, so adjust the dose rather than adding random exercises.
This eight-week fitness routine visual can help you keep the progression visible and organised.
Once your posture feels more natural, retain the exercises that produce the clearest benefit. A short strengthening session several times each week, regular standing and walking, and a workstation that supports neutral stacking will usually be more sustainable than an intensive corrective routine you abandon.
Bayside Osteopathic Health offers individual assessment, gentle hands-on treatment, movement advice and customized exercise support for posture-related neck, shoulder and upper-back discomfort. If rounded shoulders are affecting your comfort or function, visit Bayside Osteopathic Health to discuss an appropriate care plan.